Learning the Progressive Hose Lay
Learning the Progressive Hose Lay: A Step-by-Step Guide for Wildland Firefighters
THE FAST HOW-TO GUIDE
TEAM FAST
8/7/20254 min read
Learning the Progressive Hose Lay: A Step-by-Step Guide for Wildland Firefighters
If you've ever stared down a raging wildfire and wondered how to get water where it needs to be—fast—then the progressive hose lay is your go-to tactic. This method is a cornerstone of wildland firefighting, especially in rugged terrain where engines can't easily access the fire's edge. It's all about deploying hose packs efficiently to extend water lines while actively suppressing the fire. In this article, we'll break down the technical process step by step, drawing from established procedures used by departments like the United States Forest Service and insights from industry experts. Whether you're a rookie or a seasoned pro, mastering this can mean the difference between containment and catastrophe. Let's roll!
What is a Progressive Hose Lay?
A progressive hose lay involves pre-packaged hose bundles (often carried as backpacks) that allow firefighters to extend a main trunk line while flowing water continuously. Typically, it uses a 1.5-inch supply line with gated wyes every 100-200 feet, from which 1-inch lateral attack lines branch off for direct fire suppression. This setup is ideal for initial attack on wildfires, urban-wildland interfaces, or spots where vehicles can't reach. The key? It lets you "progress" the line forward without stopping the water flow, combining mobility with firepower. Common in agencies following NWCG standards, it's often done by 2-4 person teams for efficiency.
Preparation: Building Your Hose Packs
Prep is crucial. Hose packs are pre-assembled for quick deployment. Here's how to build a standard progressive pack, based on common methods like the Gansner or Travis styles:
1. Gather Materials: You'll need 100 feet of 1.5-inch trunk hose, a gated wye, a reducer, 100 feet of 1-inch lateral hose, and a nozzle. Use a hose bag or pack for carrying.
2. Lay Out the Hose: Stretch the 1.5-inch hose flat. Attach the gated wye to the male end.
3. Attach the Lateral Line: Connect the reducer to one outlet of the wye, then attach the 1-inch hose and nozzle. Fold the 1-inch hose in half to create a 50-foot bight, and lay it atop the 1.5-inch hose.
4. Secure It: Tape the 1-inch hose to the 1.5-inch every 3-5 feet with clear tape to prevent snags.
5. Pack It Up: Load into the bag starting with the wye/nozzle end at the bottom. For progressive packs like Gansner, coil the 1-inch line beside the wye for snag-free payout.
Repeat for multiple packs—aim for 500-1,000 feet total per engine. Types vary: Jarbo for supply lines only, Lake George for easy solo assembly. Always test packs for smooth deployment in training.
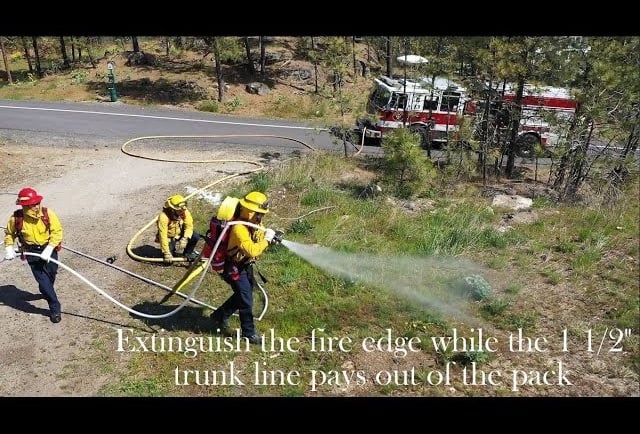
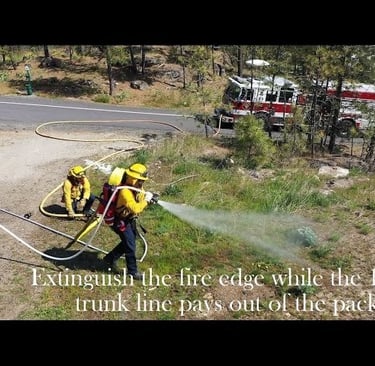
The Step-by-Step Deployment Process
For this guide, we'll focus on a 2-person team (nozzle person and hose person) deploying a 500-foot lay, as outlined in standard procedures. Assume full PPE: Nomex, helmet, gloves, boots, and eye protection. Start from an anchor point (e.g., a road or dozer line) to prevent flanking.
1. Size Up and Brief: Assess the fire (behavior, direction, fuels). Brief the team on LCES: Lookouts, Communications (radio freqs), Escape routes, Safety zones. Don hose packs and secure tools like clamps.
2. Deploy Starter Hose: Connect the nozzle to the first hose section and attach to the engine's discharge. Nozzle person calls for water: Close bale, bleed air, adjust to fog/straight stream, start at anchor point.
3. Advance and Wet the Line: Nozzle person advances, alternating patterns to knock down fire and create a wet line. Stop with ~10' slack (verbalized by hose person). Keep knocking fire ahead.
4. Extend the Lay (First Extension): Hose person removes hose from nozzle person's pack, deploys the 2nd section fully, clamps the line. Nozzle person opens nozzle to release pressure, hands female coupling to hose person, receives male, reattaches nozzle, calls for water. Hose person connects couplings, releases clamp slowly.
5. Repeat Advancement: Nozzle person bleeds air, adjusts pattern, advances again creating wet line with 10' slack.
6. Second Extension: Repeat step 4 for the 3rd hose: Deploy, clamp, exchange couplings, connect, release clamp.
7. Switch Positions: Mid-lay (around 300'), switch roles for fatigue management.
8. Continue Extensions: Repeat for 4th and 5th hoses: Advance, deploy, clamp, connect, flow water. Always maintain continuous flow.
9. Final Advance and Secure: On the last section, advance to pinch the fire head, create wet line, then slowly close nozzle. Mop up hotspots.
This should take under 8 minutes for 500 feet in training. For larger teams, add roles like lookout or additional hose carriers.
Tips for Success and Common Pitfalls
- Efficiency Hacks: Use pre-connected wyes every 200' for laterals to handle spots. Anchor and flank the active side first, pinching the head to stop spread.
- Avoid Mistakes: Don't chase the fire without LCES—always keep one foot in the black (burned area). Poor packing leads to snags; test deployments. Overextending without water risks dry lines.
- Safety First: Monitor for fatigue, dehydration, and fire behavior changes. Use clamps to avoid bursts when connecting.
Wrapping It Up: Why This Skill Matters
The progressive hose lay turns chaos into control, allowing rapid water application in tough spots. Practice it regularly—your next fire depends on it. Stay safe, stay hydrated, and keep training!
Sources
- Wildland Progressive Hose Lay (2021) Video: https://www.youtube.com/watch?v=79wmM-xxUuQ
- Fresno City Fire Department Training Manual Section 316.035: https://documents.fresno.gov/WebLink/0/edoc/2047951/316.035%20-%20Deploy%20a%20Progressive%20Hose%20Lay.pdf
- The Art of a Quality Wildland Fire Hose Lay - Ambry Equipment: https://ambryequipment.com/firefighting-gear/uncategorized/a-quality-hose-lay
- The Different Types of Wildland Hose Packs - Supply Cache: https://www.supplycache.com/blogs/news/the-different-types-of-wildland-hose-packs
- Pendleton Fire Department Chapter 12.0 Wildland Firefighting: https://www.pendletonor.gov/media/3581
- HOSE LAY DEMO - CAL FIRE: https://www.facebook.com/CALFIRESANDIEGO/posts/hose-lay-demo-ever-wonder-how-firefighters-get-the-upper-hand-on-a-moving-wildfi/1308244064663325
List of Acronyms
- LCES: Lookouts, Communications, Escape Routes, Safety Zones
- NWCG: National Wildfire Coordinating Group
- PPE: Personal Protective Equipment